CertExams.com Simulator Lab Exercises Answers
Console Based :
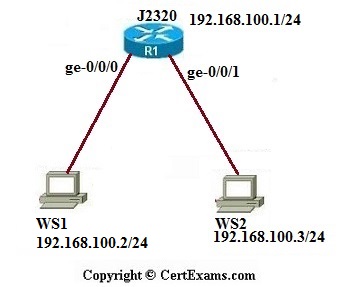
Description: Lab Exercise explains Tracing route from Work stations to router
Instructions:
1. Connect to R1 and configure the IP address of 192.168.100.1/24 on the ge-0/0/0 interface
2. To assign ip address to WS1 click network diagram button and in network diagram window click WS1 icon from the diagram. In Ws1 prompt type 192.168.100.2/24 as ip address and default gateway 192.168.100.1
3. To assign ip address to WS2 click network diagram button and in network diagram window click WS1 icon from the diagram. In WS2 prompt type 192.168.100.3/24 as ip address and default gateway 192.168.100.1
4. Traceroute R1 from WS1 and WS2
GUI Based :
Instructions:
1. Select device R1 from Select device drop down box
2. Click configure button to enable left navigation pane
3. Select Interfaces > Interface Configuration from left navigation pane. Interface Configuration screen appears , select ge-0/0/0 interface from available interface list and click Edit button.
4. Configure Interfaces screen appears enter the ip address as 192.168.100.1 in ip address field and prefix as 24 and click OK button.
5. To assign ip address to WS1 select WS1 from Select device drop down , and click PC IPV4 properties from left navigation pane
6. PC IPV4 properties window appears click option button use the following ip address , ip address feild ge enabled enter ip address as 192.168.100.2 , mask as 255.255.255.0 and default-gateway as 192.168.100.1 and click OK button
7. To assign ip address to device WS2 , select the device WS2 from left navigation pane and click PC IPV4 properties from left navigation pane
8. PC IPV4 properties window appears , click option button Use the following ip address , ip address will get enabled and enter ip address as 192.168.100.3 , mask as 255.255.255.0 and default-gateway 192.168.100.1 and click OK button.
9. To trace route from WS1 to R1 select device WS1 and click Troubleshoot button to enable left navigation pane , click Traceroute option.
10. Ping/traceroute window appears enter the ip address 192.168.100.1 in the Ping/traceroute field and click OK button.
11. Repeat step 9 and 10 for device WS2
Note: Please refer to the CertExams.com Juniper Network Simulator software for complete lab with GUI Interface.


