CertExams.com Simulator Lab Exercises Answers
Console Based :
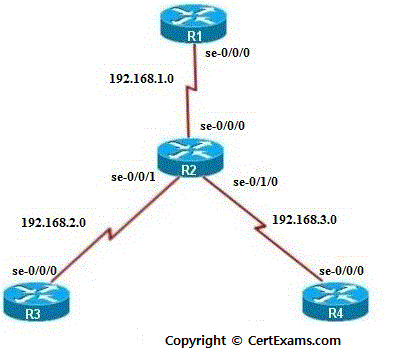
Description: This lab exercise explains how ping and traceroute works in MPLS network.

Instructions:
1.Assign the IP addresses to all the devices
2.Enable MPLS family on the interfaces
3.Enable MPLS and LDP protocol on the interfaces
4.Issue “show route forwarding-table” to display routes in the forwarding table
5.Issue ping and trace route command to check the connectivity
GUI Based :
Instructions:
1. Select device R1 and click configure button and select Interface > Interface Configuration from left navigation pane assign ip addresses to se-0/0/0 and lo interface as per the table.
2. Select MPLS -> MPLS Configuration from left navigation pane
3. Select se-0/0/0 interface from Enable MPLS family on the interface drop down and click Add button.
4. Click option button Select interface from Enable MPLS protocol on the interface and Enable LDP protocol on the interface and select se-0/0/0 interface from drop down and click OK button.
5. Select device R2 and select Interfaces -> Interface Configuration and assign ip addresses to se-0/0/0 , se- 0/0/1 , se-0/1/0 and lo interfaces as per the table.
6. Select MPLS -> MPLS Configuration from left navigation pane
7. Repeat step 3 to enable MPLS family on the interfaces se-0/0/0 , se-0/0/1 and se-0/1/0 interfaces.
8. Click the options button All from Enable MPLS protocol on the interface and Enable LDP protocol on the interface and click OK button.
9. Select device R3 and select Interfaces -> Interface Configuration and assign ip addresses to se-0/0/0 ,lo interfaces as per the table.
10. Select MPLS -> MPLS Configuration from left navigation pane and repeat step 3 to enable MPLS family on the interface se-0/0/0
Note: For complete instructions please refer to the CertExams.com Juniper Network Simulator software for complete lab with GUI Interface.