CertExams.com Simulator Lab Exercises Answers
Console Based :
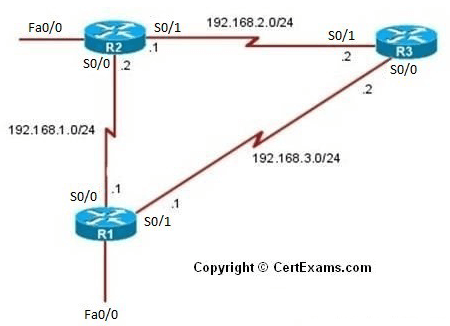
Description: The purpose of this Lab is to configure OSPF on all the devices and test for ping and trace commands.
The router ospf 1 command given in the lab below selects OSPF as the routing protocol.
Instructions:
1) Assign the IP address of all the devices as given below
| Device | Interface | IP Address | Mask |
| R1 | S0/0 S0/1 |
192.168.1.1 192.168.3.1 |
255.255.255.0 255.255.255.0 |
| R2 | S0/0 S0/1 |
192.168.1.2 192.168.2.1 |
255.255.255.0 255.255.255.0 |
| R3 | S0/0 S0/1 |
192.168.3.2 192.168.2.2 |
255.255.255.0 255.255.255.0 |
2. Bring all the interfaces to up
3. Configure OSPF on all the Devices, Use Process ID 1 and Autonomous System number 0
4. From R1 issue ping and trace commands to R2-S0/1 and R3-S0/1 interfaces and check the connectivity
On R1:
R1>enable
R1#configure terminal
R1(config)#interface serial 0/0
R1(config-if)#ip address 192.168.1.1 255.255.255.0
R1(config-if)# no shutdown
R1(config-if)#exit
R1(config)#interface serial 0/1
R1(config-if)#ip address 192.168.3.1 255.255.255.0
R1(config-if)# no shutdown
R1(config-if)#exit
R1(config)#router ospf 1
R1(config-router)#network 192.168.1.0 0.0.0.255 area 0
R1(config-router)#network 192.168.3.0 0.0.0.255 area 0
On R2:
R2>enable
R2#configure terminal
R2(config)#interface serial 0/0
R2(config-if)#ip address 192.168.1.2 255.255.255.0
R2(config-if)# no shutdown
R2(config-if)#exit
R2(config)#interface serial 0/1
R2(config-if)#ip address 192.168.2.1 255.255.255.0
R2(config-if)#no shutdown
R2(config-if)#exit
R2(config)#router ospf 1
R2(config-router)#network 192.168.1.0 0.0.0.255 area 0
R2(config-router)#network 192.168.2.0 0.0.0.255 area 0
On R3:
R3>enable
R3#configure terminal
R3(config)#interface serial 0/0
R3(config-if)#ip address 192.168.3.2 255.255.255.0
R3(config-if)# no shutdown
R3(config-if)#exit
R3(config)#interface serial 0/1
R3(config-if)#ip address 192.168.2.2 255.255.255.0
R3(config-if)#no shutdown
R3(config-if)#exit
R3(config)#router ospf 1
R3(config-router)#network 192.168.3.0 0.0.0.255 area 0
R3(config-router)#network 192.168.2.0 0.0.0.255 area 0
On R1:
R1#ping 192.168.2.2
R1#ping 192.168.2.1
R1#trace 192.168.2.2
R1#trace 192.168.2.1
GUI Based :
Instructions:
1. Select R1 from Select Device drop down box.
2. Choose configure > Interface Management > Interface and Connections.
3. In Edit Interface connections tab select the S0/0 interface and click edit button
4. Configure the IP address as 192.168.1.1 255.255.255.0 and enable the interface status, also configure the s0/1 interface ip address as 192.168.3.1 255.255.255.0 and enable the interface status.
5. Choose Router > Dynamic Routing select OSPF from the protocol list and click Edit button.
6. In the Edit IP dynamic routing window enter OSPF process id 1 and click add button to add a network.
7. Enter 192.168.1.0 as network address , wildcard mask 0.0.0.255 and area 0 and click OK button , click add button again in Edit IP Dynamic Routing window and add the network 192.168.3.0 , wildcard mask 0.0.0.255 and area 0 in add a network window and click OK button.
8. Select device R2 from Select Device drop down box.
9. Repeat steps 2 – 7 for configuring R2 S0/0 interface ip address as 192.168.1.2 255.255.255.0 , S0/1 interface ip address as 192.168.2.1 255.255.255.0 and network addresses 192.168.1.0 ,192.168.2.0 , wildcard mask as 0.0.0.255 and area 0.
10. Select R3 from Select Device drop down box.
11. Repeat steps 2 – 7 for configuring R3 S0/0 interface ip address as 192.168.3.2 255.255.255.0 , S0/1 interface ip address as 192.168.2.2 255.255.255.0 and network addresses 192.168.3.0 ,192.168.2.0 , wildcard mask as 0.0.0.255 and area 0.
12. From R1 issue ping and trace commands to R2-S0/1 and R3-S0/1 interfaces and check the connectivity
Note: Please refer to the CertExams.com Network Simulator software for complete lab with GUI Interface.


