CertExams.com Simulator Lab Exercises Answers
Console Based :
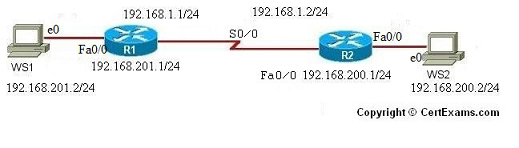
Description : This lab demonstrates configuring and implementing static routes in a network.
Instructions:
1. Configure R1's fastethernet 0/0 interface with IP Address 192.168.201.1/24 and serial0/0 interface with IP Address 192.168.1.1/24 and enable the interfaces
2. Configure R2's fastethernet 0/0 interface with IP Address 192.168.200.1/24 and serial0/0 interface with IP Address 192.168.1.2/24 and enable the interfaces
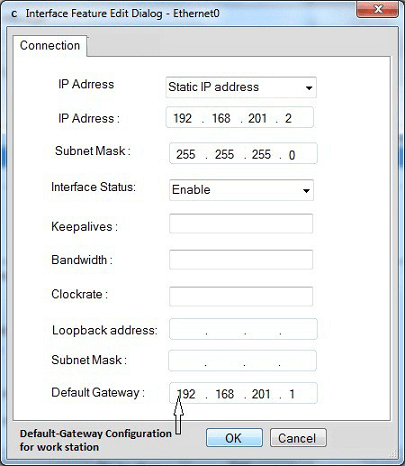
3. Configure workstations WS1 and WS2 with the IP addresses and default-gateways as shown in the figure
4. Ping from R1 to R2, R1 to WS1 and R2 to WS2 and see that they are successful
5. Ping from WS1 to WS2 and see that it fails
6. Now set up a static route on R1 and R2 using ip route command and by specifying the appropriate destination address and next hop address
7. Now ping from WS1 to WS2 and see that it is success.
Note: Please refer to the CertExams.com Network Simulator software for complete lab with commands.
GUI Based :
Instructions:
1. Select R1 from Select Device drop down box. Click Configure button to enable left navigation pane.
2. Choose > Interface Management > interface and connections from left navigation pane and in the edit interface connection tab select the interface fastethernet0/0 from interface list and click Edit button.
3. In the edit interface feature dialog enter the ip address 192.168.201.1,mask 255.255.255.0 and enable the interface from interface status drop down box and click OK button.
4. In edit interface connection tab select S0/0 interface and click Edit button.
5. In the edit interface feature dialog enter the ip address 192.168.1.1,mask 255.255.255.0 and enable the interface from interface status drop down box and click OK button.
6. Select R2 from Select Device drop down box. Configure R2's fastethernet0/0 interface with IP Address 192.168.200.1, mask 255.255.255.0 and serial0/0 interface with IP Address 192.168.1.2 , mask 255.255.255.0 and enable the interfaces. Follow step2-5
7. Configure workstations WS1 and WS2 with the IP addresses and default-gateways as shown in the figure. Follow step2-5
8. Ping from R1 to R2, R1 to WS1 and R2 to WS2 and see that they are successful. Choose utilities > Ping and Traceroute
9. Ping from WS1 to WS2 and see that it fails.
10. Now set up a static route on R1 and R2 using ip route command and by specifying the appropriate destination address and next hop address.
11. Select R1 from Select Device drop down box and Choose Router > Static Routing. A Static routing screen appears click add button , Add IP static route window appears enter prefix as 192.168.200.0 , mask 255.255.255.0 and next hop address as 192.168.1.2 and click OK button.
12. Select R2 from Select Device drop down box and Choose Router > Static Routing. A Static routing screen appears click add button ,Add IP static route window appears enter prefix as 192.168.201.0 , mask 255.255.255.0 and next hop address as 192.168.1.1 and click OK button.
13. Now ping from WS1 to WS2 and see that it is success.


