CertExams.com Simulator Lab Exercises Answers
Console Based :
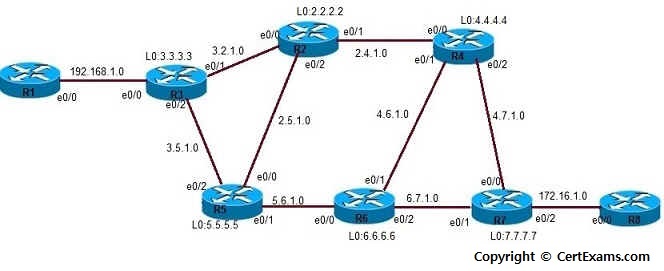
Description: In this example network is configured with RIP as routing protocol.
 Instructions
1. Assign the IP addresses to all the devices as per the diagram.
2. Bring all the interfaces to up.
3. Issue network command on all the devices to identify the networks to be advertised by the RIP process.
4. Enable the Cisco express forwarding on the router
5. Configure LDP on all interfaces for all routers
6. Configures MPLS hop-by-hop forwarding on the interface.
Note: Please refer to the CertExams.com Network Simulator software for complete lab with commands.
GUI Based :
Instructions:
1. Select device R1 from Select device drop down box. Click Configure > Router > MPLS
2. Select MPLS from Item Name and click Edit button
3. In Device properties window click MPLS tab
4. Click enable ip cef.
5. Click enable MPLS protocol
6. Select the interface Fa 0/0 from drop down list select MPLS ip and click save button and close button.
7. Configure the ip address of the device R1 click Interface Management > Interface and Connections > Edit Interface Connections > select Fa0/0 interface and click Edit button.
8. In interface feature edit dialog set the ip address 10.1.1.1 and mask 255.255.255.0 and click OK button.
9. Select device R2 from device drop down list. Click Configure > Router > MPLS
10. In Device properties window click MPLS tab
11. Click enable ip cef and MPLS protocol
12. Select the interface Fa 0/0 from drop down list select MPLS ip and click save button.
13. Select the interface Fa 0/1 from drop down list select MPLS ip and click save button and then click close button.
14. Configure the ip address of the device R2 click Interface Management > Interface and
Connections
>Edit Interface Connections > select Fa0/0 interface and click Edit button.
15. In interface feature edit dialog set the ip address 10.1.1.2 and mask 255.255.255.0 and click OK button.
16. In Edit interface connection tab select fa0/1 interface and click Edit button.
17. In interface feature edit dialog set the ip address 10.2.2.2 and mask 255.255.255.0 and click OK button.
18. Select device R3 from device drop down list. Click Configure > Router > MPLS
19. In Device properties window click MPLS tab
20. Click enable ip cef and MPLS protocol
21. Select the interface Fa 0/0 from drop down list select MPLS ip and click save button and close button.
22. Configure the ip address of the device R3 click Interface Management > Interface and Connections > Edit Interface Connections > select Fa0/0 interface and click Edit button.
23. In interface feature edit dialog set the ip address 10.2.2.3 and mask 255.255.255.0 and click OK button.
24. Issue "show MPLS interfaces", "show MPLS forwarding-table" and "show MPLS ldp neighbor" command using View > IOS show command.
25. To configure loopback address select device R1 from drop down box and click Interface Management > Interface and Connections > Edit Interface Connections and click Edit button. Enter the loopback address of R1 as 1.1.1.1 255.255.255.0 in Interface Feature Edit dialog and click OK button.
26. Select device R2 from drop down box and repeat step 25 for router R2 with loopback address 2.2.2.2 255.255.255.0
27. Select R3 from drop down box and repeat step 25 for R3 with loopback address 3.3.3.3 255.255.255.0
28. Issue "show MPLS ldp neighbor" command using View > IOS show command.
Note: Please refer to the CertExams.com Network Simulator software for complete lab with GUI Interface.


