CertExams.com Simulator Lab Exercises Answers
Description : This lab exercise verifies Extended Access lists that are set up in the previous lab to ensure that they have been set up and configured correctly.
Instructions:
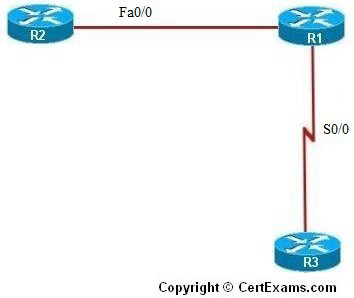
1. Connect to R3 and try to ping R1’s Serial 0/0 interface, the result is ping should be unsuccessful if the access lists are configured correctly
2. Next, verify that telnet traffic from that subnet is allowed to reach R1, connect to R1 and enable telnet access, and set password to cisco
3. Connect to R3 again and try to telnet into R1’s Serial 0/0 interface
4. The hostname in the router prompt should change to R1 if telnet access is permitted, now press CTRL+SHIFT+6 key combination followed by X key to return to R3.Then type disconnect 1 to close the connection to R1
5. Connect to R2 and try to ping R3’s Serial 0/0 interface and see that the ping is not successful
Explanation: The packet starts at R2, travels through R1, and reaches R3. Once it arrives at R3, it is repackaged and sent back to R1. When R3 repackages the packet, the packet’s source IP address becomes the destination IP address, and the destination IP address becomes the source IP address. When the packet encounters the access list on R1’s serial 0/0 interface, it is blocked because the packet’s source IP address is R3’s serial 0/0 address.
6. Try to ping R1’s fa0/0 interface from R2
7. Now try to telnet into R1’s fa0/0 interface from R2. The hostname in the router prompt should change to R1 if telnet access is permitted. Press CTRL+SHIFT+6 followed by X to return to R2, then type disconnect 2 command to close the connection to R1
8. Issue “show access-lists” command which displays the access lists that have been created
on a router and also specifies how many packets have been permitted or denied
Note: Please refer to the CertExams.com Network Simulator software for complete lab with commands.


