CertExams.com Simulator Lab Exercises Answers
Console Based :
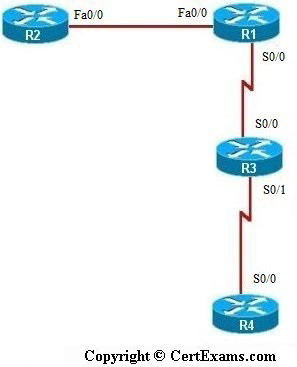
Description : This lab exercise demonstrates configuring Enhanced IGRP Routing Protocol and also demonstrates the various EIGRP show commands.
Instructions:
1. Assign the IP Addresses of all the devices as per the table below
| Device | Interface | IP Address | Mask |
| R1 | Fa0/0 S0/0 |
192.168.1.1 |
255.255.255.0 255.255.255.0 |
| R2 | Fa0/0 | 192.168.1.2 | 255.255.255.0 |
| R3 | Fa0/0 S0/0 |
192.168.100.2 192.168.200.1 |
255.255.255.0 255.255.255.0 |
| R4 | S0/0 | 192.168.200.2 | 255.255.255.0 |
2. Bring all the
interfaces to up
3. Configure EIGRP on all
the devices, use Autonomous System Number 0
4. On R4, issue show ip
protocols command which displays the dynamic routing protocols running
on R4
5. On R1, issue show ip
eigrp neighbors command which displays its eigrp neighbors
6. On R1,issue show ip eigrp
traffic command which displays the statistics for EIGRP packets sent and
received, and show ip eigrp topology command which displays EIGRP
topology database
7. From R4, ping R1 and R2
to check connectivity and see that the ping is successful
Note: Please refer to the CertExams.com Network Simulator software for complete lab with commands.
GUI Based :
Instructions:
1. Select R1 from Select Device drop down box.
2. Choose configure > Interface Management >Interface and Connections.
3. In Edit Interface connections tab select the S0/0 interface and click edit button
4. Configure the IP address as 192.168.100.1 255.255.255.0 and enable the interface status.
5. In Edit Interface connections tab select the Fa0/0 interface and click edit button
6. Configure the IP address as 192.168.1.1 255.255.255.0 and enable interface status.
7. Choose Router > Dynamic Routing select EIGRP from the protocol the list and click Edit button.
8. In the Edit IP dynamic routing window enter Autonomous System Number as 0 and click add button to add a network.
9. Enter 192.168.1.0 as network address and click OK button.
10. Click Add button again in Edit IP dynamic routing screen and enter 192.168.100.0 as network address and click OK button.
11. Select R2 from Select Device drop down box.
12. Repeat steps 2-10 for configuring R2 with Fa0/0 interface ip address as 192.168.1.2 255.255.255.0 and network address as 192.168.1.0
13. Select R3 from Select Device drop down box.
14. Repeat steps 2-10 for configuring R3 with S0/0 interface ip address as 192.168.100.2 255.255.255.0 and S0/1 ip address as 192.168.200.1 255.255.255.0 and network address as 192.168.100.0 and 192.168.200.0 15. Select R4 from Select Device drop down box.
16. Repeat steps 2-10 for configuring R4 with S0/0 interface ip address as 192.168.200.2 255.255.255.0 and network address as 192.168.200.0
17. Select R1 from Select Device drop down box.
18. Click view > IOS show commands from left navigation pane .
19. Issue “show ip eigrp neighbors” command from show command drop down list which displays its eigrp neighbors also issue “show ip eigrp topology” command which displays EIGRP topology database.
20.Select R4 from Select Device drop down box and click Utilities > ping and traceroute and type destination ip address as 192.168.100.1 and click ping button and also ping the ip address 192.168.1.2
Note: Please refer to the CertExams.com Network Simulator software for complete lab with GUI Interface.


