CertExams.com Simulator Lab Exercises Answers
Console Based :
Description: Use the traceroute command to map the IP addresses that a packet travels through to get from one device to another.
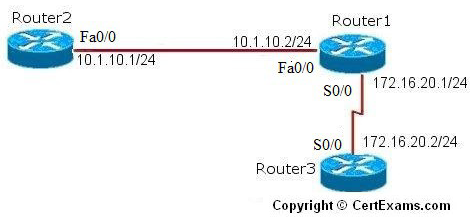
IP Address Assignment Table
| Device | Interface | IP Address/Mask |
| Router1 | Fa0/0 S0/0 |
192.168.10.2/24 |
| Router2 | Fa0/0 | 192.168.10.1/24 |
| Router3 | S0/0 | 192.168.20.2/24 |
Instructions:
1. Configure routers to the specification given below
2. Enable RIP routing across all three routers
3. From Router1, ping the directly connected routers and their interfaces which are Router2 fastethernet 0/0 and Router3 serial 0/0
4. You should be able to ping non-directly connected routers as RIP routing is enabled
5. Next , the traceroute command is entered which helps in determining the path of a packet to its
destination
Note: Please refer to the CertExams.com Network Simulator software for complete lab with commands.
GUI Based :
Description: Use the traceroute command to map the IP addresses that a packet travels through to get from one device to another.
Instructions:
1. Select R1 from Select Device drop-down box change the hostname as Router1 using Router > Router Options this displays Device Properties screen in that select Host Name and click Edit button. The Host Name Configuration screen appears enter the host name and click save button.
2. Choose configure > Interface Management >Interface and Connections.
3. In Edit Interface connections tab select the required interface and click edit button
4. Configure the IP address as per the above table for router Router1.
5. To enable RIP routing on the router choose Router > Dynamic Routing.
6. Routing screen appears select RIP from the protocol list and click Edit button.
7. Edit IP dynamic routing window appears click add button
8. Add a network window appears enter network address 192.168.10.0 and click OK button.
9. Again click add button add another network 192.168.20.0 and click OK button.
10. Repeat the steps 1-8 for configuring router R2 and R3
11. Issue Traceroute command using Utilities > Ping and Traceroute and enter the proper destination address and click Traceroute button.
Note: Please refer to the CertExams.com Network Simulator software for complete lab with GUI Interface.


