Description
: This exercise demonstrates the concept of
Router on a stick.
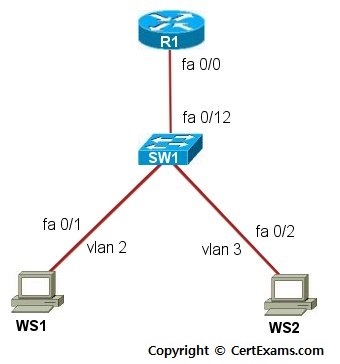
Instructions:
1. Configure R1 with
sub-interface fastethernet 0/0.10
with IP Address 192.168.100.2 255.255.255.0 and set the encapsulation to
dot1q 2 and sub-interface fastethernet 0/0.20 with IP Address
192.168.200.2 255.255.255.0 and set its encapsulation to dot1q 3
2. Check the routing table
on R1 by issuing show ip route command
3. Connect to switch SW1 and
create VLANs 2 and 3
4. Add the SW1 port fa 0/1
to VLAN 2 using “switchport access vlan <num>” command
5. Add the SW1 port fa 0/2
to VLAN 3 using “switchport access vlan <num>” command
6. Configure the workstation
WS1 with IP Address 192.168.100.1 255.255.255.0 and a default-gateway of
192.168.100.2
7. Configure the workstation
WS2 with IP Address 192.168.200.1 255.255.255.0 and a default-gateway of
192.168.200.2
8. Ping R1 from WS1 and WS2
and Ping WS2 from WS1 and see that it fails
9. Configure the trunk link
between R1 and SW1 by issuing switchport mode trunk command on SW1. Also
specify “switchport trunk encapsulation dot1q” on SW1 in interface
configuration mode
10. Check the trunk
information using show interfaces trunk command
11. Ping R1 from WS1 and WS2
and Ping WS2 from WS1 and see that it is successful as there is a trunk
line now created on SW1
Note: Please refer to the CertExams.com Lab Simulator For
Network+ software for complete lab with commands.
Cert-Ex™ Exam Simulators, Cert-Ex™ Network Simulator, Cert-Ex™ Cheatsheets are written independently by CertExams.com and not affiliated or authorized by respective certification providers. Cert-Ex™ is a trade mark of CertExams.com or entity representing Certexams.com.Network+™ is a trademark of CompTIA® organization.


