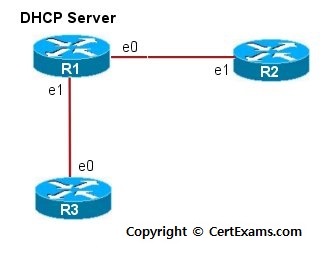
Description: This lab exercise demonstrates DHCP server configuration and DHCP client configuration on two routers and also shows the verification commands both on the server and the client.
Instructions
1. Issue service dhcp command on router R1 that enables DHCP server
feature on router
2. Create an addressing pool for dhcp called pool1.
3. Isssue network command that specifies the range of IP addresses to
be assigned to clients. Use 192.168.4.0 255.255.255.0 in this lab.
4. Assign the domain-name "sample.com" to the client.
5. Assign the IP Address of the DNS-server and Default-router, say
192.168.4.2 and 192.168.4.5 respectively
7. Set the duration of the lease to 4 days.
8. On router R2 and R3, enter into interface confiuration mode and
issue the command "ip address dhcp" that configures the
interfaces to acquire IP Addresses from the DHCP server.
9. Use "show interfaces" or "show ip interface
brief" command on R2 and R3 to verify the addresses acquired from
the server.
10. Use "show ip dhcp binding" command on router R1 i.e,
server, to view the addresses assigned to clients.
11. Use "clear ip dhcp binding <client_address>" on the
server R1 to clear the specific address assigned to client or
"clear ip dhcp binding *" to remove all the addresses
assigned to clients.
12. Use "no ip address dhcp" command on clients R2/R3
in interface configuration mode to unconfigure an address assigned on
it by the DHCP server.
Note: DHCP provides dynamic addressing information to hosts on a network. It allows devices to dynamically acquire their addressing information. The main purpose of the DHCP server is to provide IP configuration parameters to hosts such as the default gateway, domain name, Domain Name System – DNS.
DHCP uses UDP protocol. Port 67 for requests and 68 for replies.
Note that as per cisco 12.2 release, only ethernet interfaces are supported for DHCP.
Cert-Ex™ Exam Simulators, Cert-Ex™ Network Simulator, Cert-Ex™ Cheatsheets are written independently by CertExams.com and not affiliated or authorized by respective certification providers. Cert-Ex™ is a trade mark of CertExams.com or entity representing Certexams.com.Network+™ is a trademark of CompTIA® organization.


