CertExams.com Simulator Lab Exercises Answers
Console Based :
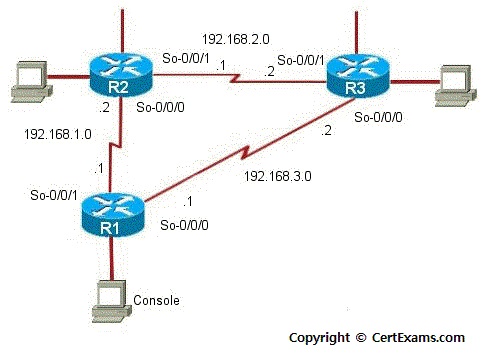
Description: The purpose of this Lab is to configure OSPF on all the devices with an area of 100 and to verify the configuration using Show commands of OSPF.
Instructions:
1. Assign the IP address of all the devices as given below
| Device | Interface | IP Address | Mask |
| R1 | So-0/0/1 So-0/0/0 |
192.168.1.1 192.168.3.1 |
255.255.255.0 255.255.255.0 |
| R2 | So-0/0/0 So-0/0/1 |
192.168.1.2 192.168.2.1 |
255.255.255.0 255.255.255.0 |
| R3 | So-0/0/0 So-0/0/1 |
192.168.3.2 192.168.2.2 |
255.255.255.0 255.255.255.0 |
2. Enable ospf (use area number as 100) on all the interfaces of all the devices
3. Issue show ospf interface on R1
4. Issue show ospf neighbor on R1
GUI Based :
Instructions:
1. Select device R1 from Select device drop down box
2. Click Configure button to enable left navigation pane
3. Select Interfaces -> Interface Configuration from left navigation pane. Interface Configuration screen appears select so-0/0/0 interface from available interface list and click Edit button.
4. Configure Interfaces screen appears enter the ip address and mask as per the above table and click OK button.
5. Repeat step 4 to assign ip address to So-0/0/1 interface
6. Select device R2 from Select device drop down box
7. Repeat steps 2-4 to assign ip addresses to so-0/0/0 and so-0/0/1 interface of R2
8. Select device R3 from Select device drop down box
9. Repeat steps 2-4 to assign ip addresses to so-0/0/0 and so-0/0/1 interface of R3
10. Select device R1 from Select device drop down box
11. Click configure button and select Routing -> OSPF from left navigation pane
12. OSPF configuration screen appears enter area id 100.
13. Select so-0/0/0 interface from select interface list and click Add button.
14. Select so-0/0/1 interface from select interface list and click Add button and then click OK button.
15. Select device R2 from Select device drop down box and repeat steps 11-14 for configuring R2's so-0/0/0 and so-0/0/1 interfaces.
16. Select device R3 from Select device drop down box and repeat steps 12-15 for configuring R3's so-0/0/0 and so-0/0/1 interfaces.
17. Select device R1 from Select device drop down box and click Monitor button.
18. Select Routing -> OSPF Information from left navigation pane.
19. OSPF information screen populated with OSPF Interface , OSPF neighbor and OSPF database information.
Note: Please refer to the CertExams.com Juniper Network Simulator software for complete lab with GUI Interface.


